

The House Projects Thread
Re: The House Projects Thread
I am loving your “spice rack” 
Re: The House Projects Thread
I have a magnetic shelf by the side door which holds my use all the time oil, so WD40, 3in1, Gorilla wood glue, Carb cleaner and silicon spray.
There is even an adjustable kitchen roll holder thats magnetic so I can put it where i'm working. When I showed the simple pleasure that gave me to the wife she gave me a look of true pity
Dave!
There is even an adjustable kitchen roll holder thats magnetic so I can put it where i'm working. When I showed the simple pleasure that gave me to the wife she gave me a look of true pity
Dave!

Re: The House Projects Thread
How about just the one smart plug controlling this?

Anyway, very nice Dave!
This is my goal -
About half way in we get to the tools and lay out..
The Evo forum really is a shadow of its former self. I remember when the internet was for the elite and now they seem to let any spastic on
IaFG Down Under Division
IaFG Down Under Division
Re: The House Projects Thread
A neater version of the 4 gang Dave yes, but if I put it in the wrong place I’d be gutted 
It was his workshop tour which helped so much, it’s a fantastic space.
Dave!
It was his workshop tour which helped so much, it’s a fantastic space.
Dave!
Re: The House Projects Thread
Make sure it has a really long cord 
Adam Savage has a new show coming - https://www.hollywoodreporter.com/live- ... el-1204331
I'm very much looking forward to it!
Adam Savage has a new show coming - https://www.hollywoodreporter.com/live- ... el-1204331
I'm very much looking forward to it!
The Evo forum really is a shadow of its former self. I remember when the internet was for the elite and now they seem to let any spastic on
IaFG Down Under Division
IaFG Down Under Division

Re: The House Projects Thread
We're now moving on to re-decorating the dining room in our house. I didn't post in this thread at the time but I painted the walls in late December last year to freshen it up before Christmas:

Next job was to re-site the light fitting so it was over the table and replaster the ceiling as it looked like someone had previously used filler and a spreader across the entire surface resulting in a finish that was as cratered as the surface of the moon

The electrician came back this week and fitted a hook to take the new Chandelier so my job for this weekend is to cover the walls, paint the ceiling and coving and, gulp, assemble and fit a murano glass chandelier.
Not being an electrician, this last bit has me scratching my head a bit and I wonder if any of you guys can help. Essentially we have three wires coming out the ceiling (brown - live, blue - neutral and a bare copper wire without insulation - ground). This connects fine to the main wire into the metal column that forms the spine of the chandelier which is also three wire. The issue gets when you reach the point of connecting to the arms which are only two wires each.
Obviously one set should go to the live and one to the neutral but what to do with the ground. Looking at the metal rod, it seems to have a very thin washer with a copper tab on it (as pictured below the plastic washer in the picture below). I'm guessing this might be where I attach the ground? I can't see what other purpose it serves. Unhelpfully the diagram / instructions are in pidgin English translated from Italian and doesn't show this part at all!

Anyone have any ideas?
Next job was to re-site the light fitting so it was over the table and replaster the ceiling as it looked like someone had previously used filler and a spreader across the entire surface resulting in a finish that was as cratered as the surface of the moon
The electrician came back this week and fitted a hook to take the new Chandelier so my job for this weekend is to cover the walls, paint the ceiling and coving and, gulp, assemble and fit a murano glass chandelier.
Not being an electrician, this last bit has me scratching my head a bit and I wonder if any of you guys can help. Essentially we have three wires coming out the ceiling (brown - live, blue - neutral and a bare copper wire without insulation - ground). This connects fine to the main wire into the metal column that forms the spine of the chandelier which is also three wire. The issue gets when you reach the point of connecting to the arms which are only two wires each.
Obviously one set should go to the live and one to the neutral but what to do with the ground. Looking at the metal rod, it seems to have a very thin washer with a copper tab on it (as pictured below the plastic washer in the picture below). I'm guessing this might be where I attach the ground? I can't see what other purpose it serves. Unhelpfully the diagram / instructions are in pidgin English translated from Italian and doesn't show this part at all!
Anyone have any ideas?

Re: The House Projects Thread
Yes, ground is for the external metal parts so that would appear to be the right place to connect it.
Surprised you only have the live and neutral wires otherwise; every time I've replaced a light fitting they've been on a ring circuit so have 5 wires plus earth, three live and two neutral. Which are all the same colours as each other so if you lose track of which is switched and which isn't, you'll have a real sod sorting it out.
Surprised you only have the live and neutral wires otherwise; every time I've replaced a light fitting they've been on a ring circuit so have 5 wires plus earth, three live and two neutral. Which are all the same colours as each other so if you lose track of which is switched and which isn't, you'll have a real sod sorting it out.

Re: The House Projects Thread
Whenever I change a light fitting I take a photo of the wiring before I remove it from the old fitting and require it the same way. Sometimes you have all sorts of quirky solutions with hidden junction boxes to serve multiple fittings and switches.
If they worked before, they’ll work again!
If they worked before, they’ll work again!
Re: The House Projects Thread
Bang on - though even a photo wouldn't have helped much when I replaced a light fitting once where all five live and neutral wires were the same colourRich B wrote: ↑Thu Jun 06, 2019 2:10 pm Whenever I change a light fitting I take a photo of the wiring before I remove it from the old fitting and require it the same way. Sometimes you have all sorts of quirky solutions with hidden junction boxes to serve multiple fittings and switches.
If they worked before, they’ll work again!
Re: The House Projects Thread
Yes that doesn't sound like fun and glad that's not the case here as this light fitting is not easy to just prop up whilst you fiddle with it... On the plus side, the hilarious Italian translations in the instructions are keeping me amused:
"Predispose a hook appropriated to the ceiling where to be able to couple the luminaire"
"Predispose a hook appropriated to the ceiling where to be able to couple the luminaire"
Re: The House Projects Thread
On disassembly and closer inspection, looks like it is indeed a collar to attach the earth:


-
NotoriousREV

- Posts: 6437
- Joined: Wed Apr 11, 2018 4:14 pm
Re: The House Projects Thread
I need some advice from the patio experts.
I have a space in my back garden that I want to pave (to eventually put a shed on). It’s walled on 3 sides and the natural slope of the garden heads towards the back wall, so obviously I can’t have the fall heading away from the walls. Do I just leave a gravel strip around the 3 edges to allow for soak away and have the fall head towards the back wall, or do I need to do something more?
I have a space in my back garden that I want to pave (to eventually put a shed on). It’s walled on 3 sides and the natural slope of the garden heads towards the back wall, so obviously I can’t have the fall heading away from the walls. Do I just leave a gravel strip around the 3 edges to allow for soak away and have the fall head towards the back wall, or do I need to do something more?
Middle-aged Dirtbag
Re: The House Projects Thread
Finally put this up after a year in the box!


It isn't perfect as its not 100% flush to the ceiling. Long story but basically you're supposed to use a further adjustable cup, then chain, connected to what you see there. Problem is that will drop it another 6 inches and we weren't sure we wanted it that low (plus the chain between the two top cups would be very short and possibly look odd. May try and fiddle with it further at some point (though that would require full disassembly )
It isn't perfect as its not 100% flush to the ceiling. Long story but basically you're supposed to use a further adjustable cup, then chain, connected to what you see there. Problem is that will drop it another 6 inches and we weren't sure we wanted it that low (plus the chain between the two top cups would be very short and possibly look odd. May try and fiddle with it further at some point (though that would require full disassembly
Re: The House Projects Thread
After going to Chester Zoo a couple of weeks ago I am pondering a slightly less modern look for our extension. There's a pub/restaurant inside Chester Zoo (which I highly recommend - really nice food and you won't be disturbed by school trips in there) which has an extension which we sat in. I loved the interior ambience, and think it would work quite well:

Fundamentally the big change from our current plans would be the design of the windows, which aren't that visible in that photo. Here's an external pic:

Fundamentally the big change from our current plans would be the design of the windows, which aren't that visible in that photo. Here's an external pic:
Re: The House Projects Thread
Depending on your shed I put mine on 4 legs with a really strong base. So I dug it out, put 4 slabs in and the shed sits on there with gravel all around. It’s bone dry and even in monsoon weather didn’t have a shred of damp in there.NotoriousREV wrote: ↑Sun Jul 21, 2019 3:32 pm I need some advice from the patio experts.
I have a space in my back garden that I want to pave (to eventually put a shed on). It’s walled on 3 sides and the natural slope of the garden heads towards the back wall, so obviously I can’t have the fall heading away from the walls. Do I just leave a gravel strip around the 3 edges to allow for soak away and have the fall head towards the back wall, or do I need to do something more?
The base does need to be strong though.
Dave!
-
Swervin_Mervin

- Posts: 4733
- Joined: Wed Apr 11, 2018 8:58 pm
Re: The House Projects Thread
Next on the list of our little projects was, after 7 fecking years, to finally get the downstairs toilet removed from the garage space. It was block-built in the garage space, with a door knocked through to the hallway. It was dank and horrible, and completely stymied any chances of having a car in there*.
It turns out it was a good job we looked into it properly. I'd always been bemused that it had supposedly been mini-piled at the same time that the extension was built - surely a non-structural wall shouldn't require that. I could only think that the ground was dodgy enough to warrant it. As it turns out, the steel for the upstairs front wall (1st floor is set back) hadn't been properly keyed into the original outside wall of the house. It was sat floating over its pad with the block wall^ of the toilet taking the load. It also wasn't fireboarded, but we knew that.
All now sorted, thankfully. You can see where the toilet used to be on the r/h side.
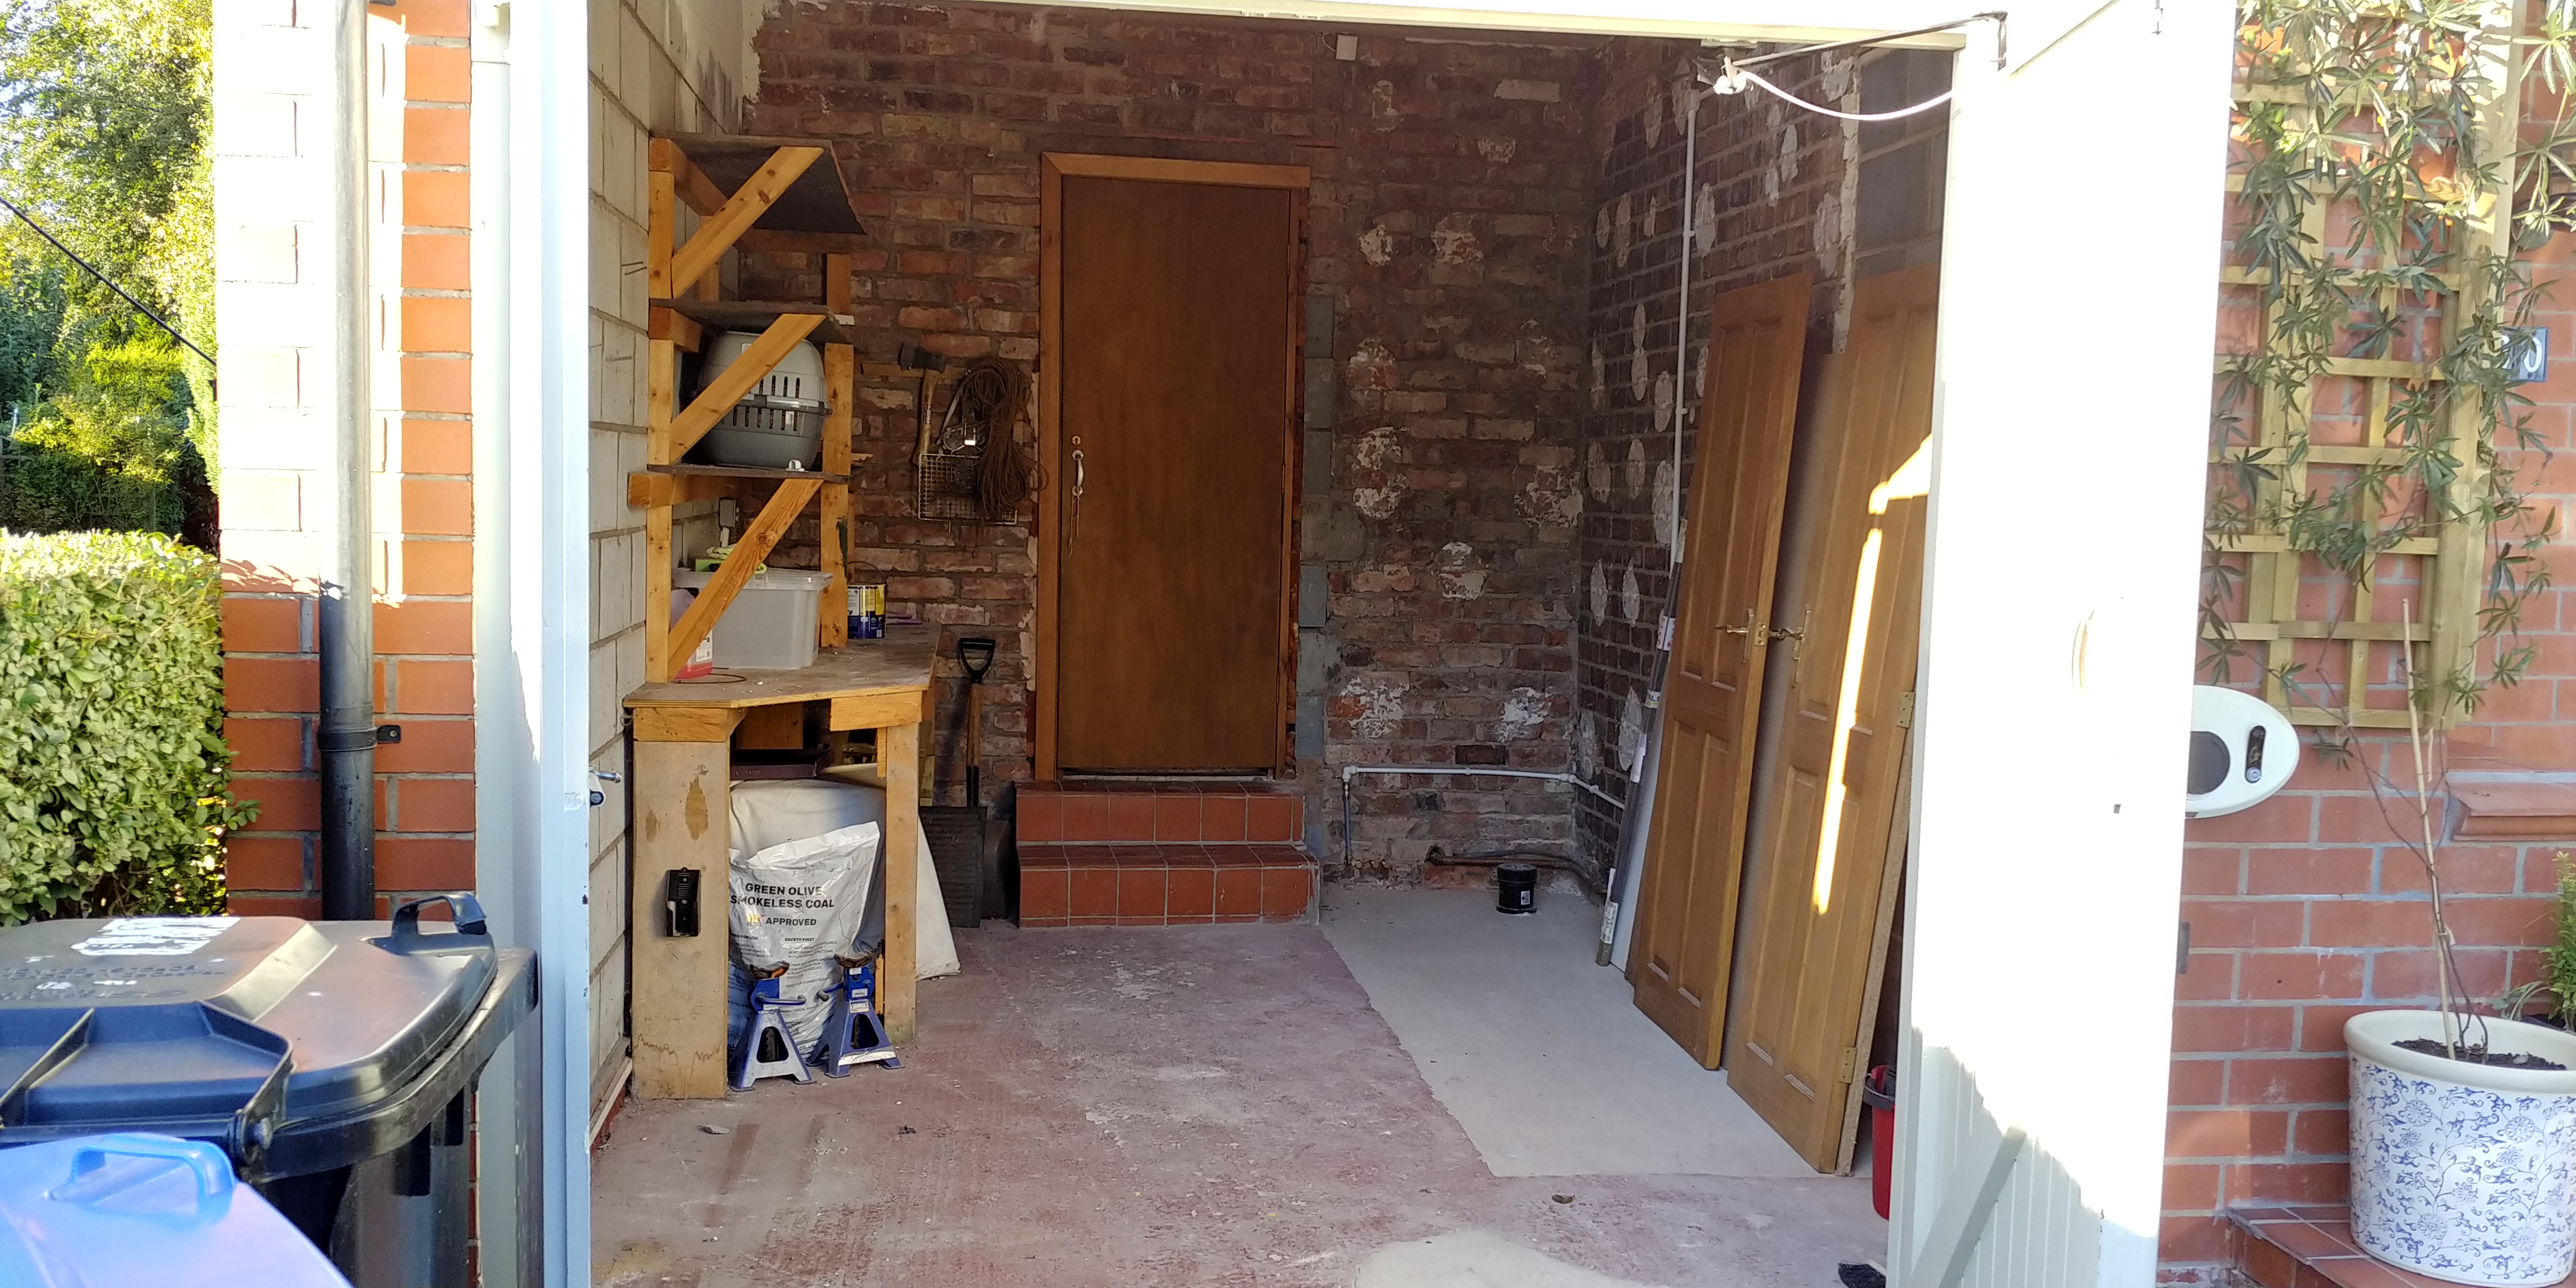
^ I say block wall. I actually mean thermolite. FFS. And they'd even used thermolite to try and pack beneath the steel and its pad
* As it happens, I might bloody well struggle to get a car in there anyway. The garage is 3.7m from doors to steps at the back and 2.88m wide. Utility room/kitchen behind and no other access to rear of property means the door and steps need to remain. The only potential option would be to move the doorway to one side to get up to 4.25m length. Move to the left and any car would have to be parked at an angle as the garage doors are set to the left. Move to the right and whilst the car could be parked straight, the doorway would be in the kitchen space, right where the Mrs wants to have a pantry cupboard.
F**k it all to hell.
It turns out it was a good job we looked into it properly. I'd always been bemused that it had supposedly been mini-piled at the same time that the extension was built - surely a non-structural wall shouldn't require that. I could only think that the ground was dodgy enough to warrant it. As it turns out, the steel for the upstairs front wall (1st floor is set back) hadn't been properly keyed into the original outside wall of the house. It was sat floating over its pad with the block wall^ of the toilet taking the load.
All now sorted, thankfully. You can see where the toilet used to be on the r/h side.
^ I say block wall. I actually mean thermolite. FFS. And they'd even used thermolite to try and pack beneath the steel and its pad
* As it happens, I might bloody well struggle to get a car in there anyway. The garage is 3.7m from doors to steps at the back and 2.88m wide. Utility room/kitchen behind and no other access to rear of property means the door and steps need to remain. The only potential option would be to move the doorway to one side to get up to 4.25m length. Move to the left and any car would have to be parked at an angle as the garage doors are set to the left. Move to the right and whilst the car could be parked straight, the doorway would be in the kitchen space, right where the Mrs wants to have a pantry cupboard.
F**k it all to hell.